DESIGN

DESIGN
DESIGN

BUILD

BUILD
BUILD

VACATION

VACATION
VACATION

Sunday Brunch @ The Tailored Tea

The Tailored Tea
It does not happen often, but when the stars are aligned just right, I get a little girl time with my mother and daughter. Today we thought it would be fun and different to go out for a Sunday brunch at a local tea house. The Tailored Tea (located directly next to the Albany Airport) is set in an historic farmhouse that was built in 1785. The Ebenezer Hills, Jr. Farmhouse is certainly not short on character. Original wide-plank wood floors, quaint rooms and period decor make this the ideal setting for this wonderful tea house.

Owner Annie Misir has clearly put time and energy into all the details that make this place so special. The menu, linens, antique porcelain china, etc. are finely balanced to give you that nostalgic Victorian feeling. We selected the freshly brewed Irish Tea in a full pot which yields about six cups of tea (half-pots are also available). My seven-year old daughter opted for farm animal-shaped pancakes, which were really fluffy and delicious. I went with their eggs benedict served over a lemon and rosemary scone, also very good. My mother went with the special which was an egg and vegetable breakfast quesadilla (not pictured). 

The Tailored Tea hosts several special events and also has private rooms for showers, parties, etc. To find out more about The Tailored Tea, please visit their website at www.thetailoredtea.com  
1

Holiday Cards on Display

One of my favorite parts of the holiday season is receiving cards from my friends and family in the mail. I love to see how children have grown and keep in the loop with what people have done throughout the year. In a world of social media and digital photography, there is something special about receiving an actual print these days. For years I have taped the cards and photos I've received on a door, entry way or even a staircase. But if you're looking for a fun and different way to display these cards I have an idea for you...
*Thanks to my dear friend Cathleen Drago for the great idea!
 
- Festive holiday ribbon of your choice (20+ feet)
- Mini craft clothes pins (I found mine at Joann Fabric)
- Depending on where you decide to display your cards (kitchen cabinets, cupboards, etc.) the amount of ribbon you'll need will differ - for my cupboard I used about 20 feet of ribbon.
- A stapler
- Holiday cards
Tie your ribbon around the door you are using for your display, and fasten ribbon together on the back side of the door using a stapler (cut excess ribbon).

I used two staples in the center where the ribbon meets, but I also added tape to the top and bottom to keep the ribbon from moving at all...
Use your clothes pins to fasten your cards to the ribbon. I alternated cards going down the ribbon...
That's it! You're done and you have a fun new way to display your holiday cards!
0

D-I-Y Bench Seating


When it comes to do-it-yourself home projects of ANY KIND, my dear friend Andrea Moschini can do just about anything. Not only is she a seasoned electrician, but she has an eye for design that few possess. If she didn't work in health care she would surely have her own show on HGTV.

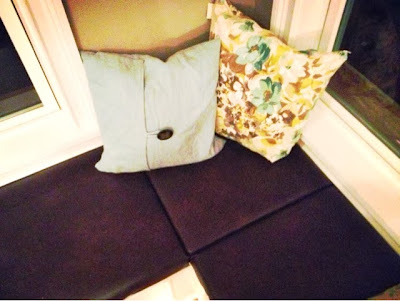
After moving into her dream home in the small community of Ghent, NY, there was no time to waste. Andrea is a wonderful cook and entertains often. With so many visitors to her amazing homestead, seating was a must! A custom corner bench is a great use of space in her home and compliments that surrounding windows just perfectly.
The corner bench unit is wonderful, but no one wants to sit on hard wood when relaxing and visiting. So Andrea created custom faux leather cushions for under $50 (seriously...under $50...I swear!)

Get your shopping list ready and dig through the couch cushions for loose change, because this is a super affordable DIY project with serious impact. Here are the materials that Andrea used...

Materials:
-4' x 8' plywood, $8 at Lowes
-Scrap 2"x4" in garage
-Scrap/clearance faux leather fabric at Joann Fabric $9/yard, regularly $25/yard ($22total)
-4' x 10 yard roll batting Joann fabric, $12 with coupon
-Staple gun and staples

Directions:
-Measure bench width and depth; 3 sections for this particular built-in
-Cut plywood to size
-Screw 2"x4" scraps  to bottom edge of plywood 
-Cover wood with multiple layers of batting and staple in place underside of plywood
-Cover batting with material or fabric of your choice and secure with staples


Here you have it! Amazing seating that didn't break the bank!!!

0

Soap Opera

One constant throughout all of our lives is the daunting chore of doing the dishes. Even with a dishwasher, it's inevitable that we will scrub dishes, utensils, etc. daily. One week from today is Christmas Day, and there will be LOTS of cooking and cleaning to be done.

While it's good to have sponges, soap, and lotions at our fingertips, the truth is that they can all be pretty unsightly.  
So...here's a quick idea for sprucing up your sink area before the guests arrive:

- Find an olive oil dispenser at a nearby retail shop (Pier 1 has a good selection of these)

- Fill the dispenser with yor favorite dish soap (I'm personally crazy over anything lavender scented)

- Next use a ceramic dish, small bowl or anything that would easily fit a sponge in it. Use that as your sponge holder, in lieu of just leaving your sponge directly on the counter or sink
One more tip...

For hand soaps and lotions, try a flat piece of wood to serve as a base and create an earthy look.


Super simple - super easy - super cheap! 
0

Jazzing-up Your Holiday Gift Wrap

This week I have posted lots of pictures and gift wrap ideas on my Facebook page. As we draw near the big event of the Christmas holiday, I wanted to be sure that I shared those ideas here on the blog as well...

Having a gift wrap station is a short-term goal of mine. I WILL have a gift wrap station within the next few months. I just think it will make my life so much easier and help to organize the clutter of wrapping paper, bows, ribbon, etc. Below is an idea from one of my favorite resources, Country Living .

Country Living Gift Wrap Station

For those of you interested in "jazzing-up" your gift wrapping, it doesn't have to be expensive. This season "I made out like a bandit" (as my mother would say) at The Christmas Tree Shops. They have a ton of gift boxes, bags, you name it. Most items cost under $1.00, except some of the gift boxes which I paid around $1.75-$2.50 for. Here are some samples of gift wrap that are sure to WOW...

Free Holiday Wrap & Ribbon from Pottery Barn Kids

89 cents each!!!
Country Elegance with Burlap Ribbon
Want to keep things super simple, and super elegant? Check out these ideas from Birds of a Feather. It's an amazing what you can do with classic brown paper...

Birds of a Feather
Birds of a Feather

If you're looking for additional ideas and samples, one of my favorite blogs to visit is "The Inspired Room". It has so much to offer and beautifully creative ideas for holiday gift wrap. Click here to visit "The Inspired Room" and see a sample photo below...

The Inspired Room
0

Easy Breezy Blueberry Scones


Every Sunday we have what we call "Special Breakfast". Not the most creative title, but we try our best to make something different and yummy. One of our favorites is Blueberry Scones. It's fun for the kiddos to help (my daughter Evey is awesome as a helper) and they aren't that difficult to make. You will feel like a Parisian pastry chef (OK...maybe that's pushing it), but you're palette is sure to enjoy this simple breakfast treat.
Start with the following:

Preheat your oven to 400 degrees (remember to always lower your temp if using a convection oven)

In a medium bowl combine 2 1/2 cups of flour, 2 tbsp. of sugar, 4 tsp. of baking powder and a 1/4 tsp. of salt. Cut in 1/3 cup of butter (I slice up a cold stick of butter ahead of time and keep refrigerated until this step). Your mixture should look like coarse crumbs - set aside.

In a separate medium bowl combine 2 eggs, 3/4 cup of heavy cream and about 1 cup of blueberries (fresh or frozen, either is fine).


Combine your blueberry/egg mixture with your dry ingredients and stir together until your flour mixture is all moistened. 

Flour a work surface to knead your dough into a circle about 10 inches in diameter (like a small pizza crust).


Cut your dough into eight wedges and place onto a baking sheet. Sprinkle with sugar on top before baking if desired.


Bake in a 400 degree oven for about 12-14 minutes.


Scones will come out fluffy and pretty!! My kids love them served with some drizzled honey and confectioners sugar (a side of bacon never hurts either) 

ENJOY!!!
2

Metal meets Wood

There is something so complimentary and cozy about the combined look of metal and wood. Maybe it's the softness of wood contrasted by the hard surface of metal. What ever it is, I love the look of it! The combination can be found around my home in various displays:


#1 - Wall Art: Reclaimed tin ceiling framed in salvaged barn wood (Silver Fox Salvage, Albany, NY)


#2 - Hall Display: Wooden side table stained in cherry, legs painted in black. Metal tins from Homegoods, one holds a candle, the other holds twigs from a tree we had to cut down in order to build our home.


#3 - Kitchen: We have Tabouret metal stools that line our island (mocha stain, soapstone surface) as well as a variety of wooden bowls and dishes, one of which I keep next to our range to soften the amount of stainless steel.


#4 - Log Holder: Although we have a gas fireplace, I love having logs next to the hearth. Below is a basket I found that is held together by a metal fence design paired with wicker. 

2

Eclectic Wall Art

Liza Salmon is a dear friend of mine. She's also an illustrator of a children's book titled "Lenny's Life Lessons" and an art teacher in an urban school district. While her creativity and talents are endless, she's also amazing at creating art out of whatever is lying around her house. For example, Liza used an old classroom map as a wall feature for a large empty wall space in her home. According to Liza, it's all about scale. Large wall, large map...perfect!


Another great idea that Liza shared with me is her frame cluster. She made this out of a bunch of frames she found lying around her home that she had no real use for. While frame clusters are a popular home design trend, you don't have to spend a dime to make it happen. As I like to call it..." Closet shopping"


Kudos to Liza for sharing her ideas...there's lots more to come with Liza Salmon so stay tuned!!

0

Holiday votive holder

Here's an idea for an eye catching and festive holiday votive candle display. For this you will need:

Votive candles, pine cones (small), freshly clipped pine twigs, uncooked rice (any kind), glass votive holder and glass cylinder (mine are from Yankee Candle):


Cut some pine twigs and gather some small pine cones...


Place twigs and pine into glass cylinder...then add rice to the bottom of your glass votive holder to hold candle in place and add an element of interest!


Place the votive holder with rice and candle into the pine cone and pine cylinder and you are finished! Boy...that was easy!!!


0

It's the Most Wonderful Time of the Year!

I love the holidays! Baking and eating and eating some more (did I mention the food yet?)...it's a great time of year to share a glass of wine with friends and family and bake up some of your finest treats. It's also a time to impress others with your holiday decor and creative displays of holiday cheer.

Here are a couple of simple and cheap ideas for sprucing up your holiday display!


Here I used white pine roping from our local grocery store ($9.99) and a pine wreath (also $9.99) - hung with burlap ribbon - to spruce up the front entrance to our home. The antique metal tins came out of our shed (one was my grandfathers and the other is an old milk cooler I scored at the annual Washington County Antique Fair). In the metal tins are two faux trees that came with lights for the bargain deal of $40 at Big Lots. I used firewood to add both weight and character to the tins in hopes of creating that winter feel.


Make your holiday decor stand out with this simple red stripe
Burlap Ribbon (bought mine at AC Moore for under $5)

Pecan Pie (Country Living Magazine)


This pecan pie was simple to make and DEE-licious! Ingredients were as follows:

1 Perfect Pie Crust
1 cup(s) Pecan Halves
2 tablespoon(s) Butter, melted
1/2 teaspoon(s) Kosher Salt
1 cup(s) Sugar
1 cup(s) Dark Corn Syrup
1 tablespoon(s) Dark Rum
1 teaspoon(s) Vanilla Extract
3 large Eggs, lightly beaten
 Whipped Cream, optional

For more information on this recipe visit this link to Country Living's website...Bon appetite!


0
Copyright 2014 The Unique Nest. Powered by Blogger.